Container Gardening Made Easy: Tips for Starting on a Concrete Pad
- Anne Demmy
- May 21
- 3 min read
A beginner’s guide to growing veggies, herbs, and flowers—even without a yard.
When I first started dreaming about a garden, I didn’t have a lush backyard or a tilled plot of land—I had a concrete pad on the side of my house. Not the most traditional setup, but it turns out: you don’t need grass to grow good things. You just need a few containers, a little creativity, and the willingness to learn as you go.
If you’re working with a similar space—like a patio, driveway, or sidewalk—here’s how I got started, and what I’ve learned along the way.
🌿 Choose the Right Containers
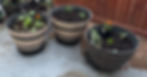
Not all pots are created equal—especially on concrete, where summer heat can be intense. When choosing containers for edibles, make sure they are food-safe. Materials like ceramic, food-grade plastic, and untreated wood are ideal for growing fruits, vegetables, and herbs safely. I use large, barrel-style planters on wheels to give my plants room to grow and make them easier to move when needed. Putting them on casters also lets water drain freely, reducing the risk of root rot and fungal disease while making it easy to sun chase or dodge the heat.
Why that matters:
Bigger pots = healthier roots and less watering
Casters = easy sun chasing (or shade dodging!)
Lifting pots off the concrete helps reduce root stress
🌱 Use High-Quality Potting Mix

Your plants can’t pull nutrients from the ground, so your soil has to do all the heavy lifting. This year, I’m experimenting with a mix that includes Miracle-Gro Organic Raised Bed Soil, Miracle-Gro Moisture Control Potting Soil, and Hapi-Gro Organic Mushroom Compost. We’ll see how it does! I also mix in a bit of fertilizer and earthworm castings for an extra nutrient boost. I’m excited to see how this blend performs and if it holds up to the Oklahoma summer.
Tip: Don’t use topsoil or regular garden dirt in containers—it gets compacted and doesn’t drain well.
☀️ Watch the Heat & Sun Exposure

Concrete surfaces absorb and radiate heat, especially in full sun. That means plants can dry out fast or get heat-stressed. Later in spring, I plan to add cedar mulch to my planters to help with moisture retention. An added benefit of using cedar mulch is its natural pest-repellent properties, making it a double win for container gardening.
Here’s what’s helped me:
Watering in the early morning
Adding mulch (like straw or shredded leaves) to help retain moisture
Grouping pots together to create shade and cooler microclimates
Planning ahead for midday sun exposure (shade cloth, umbrellas, or simply rotating pots)
🌺 Companion Planting Works in Containers, Too
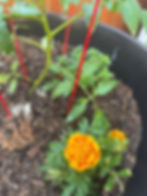
I’ve tucked in marigolds, nasturtiums, and herbs like basil and oregano alongside my veggies—not just for looks, but because they:
Attract pollinators
Repel pests naturally
Help maximize container space
It’s one of my favorite ways to bring both function and beauty into the garden. (I’ll do a deeper dive on companion planting in a future post!)
🌼 Why I Love Container Gardening on Concrete
This garden has become more than just a project—it’s my peaceful place. The rhythm of watering, tending, and watching things grow has been so good for my mental health. One of my biggest wins? Watching my first seed starts actually take this year.

🌞 Final Thoughts on How to Start a Container Garden on a Concrete Pad
Starting a container garden on concrete might sound tricky, but with the right setup, it’s totally doable—and incredibly rewarding. Whether you have a little patio or a big dream, your garden can grow right where you are.
If you’re trying this too, I’d love to hear about it! Drop your questions, wins, or favorite heat-tolerant plants in the comments below. Let’s keep learning (and growing) together! 🌱